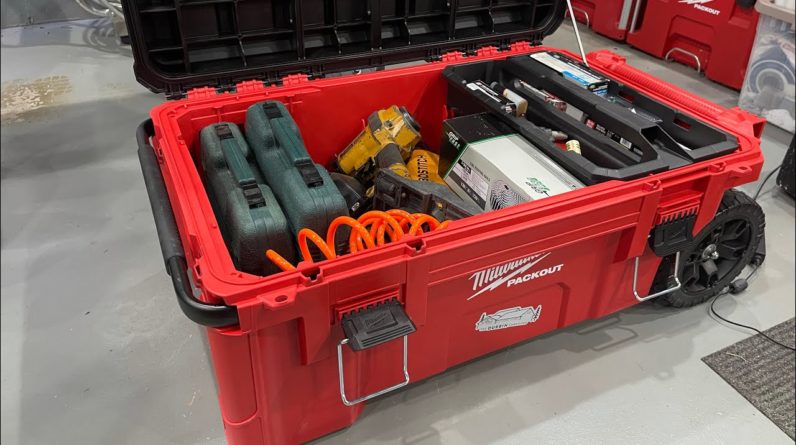
Good morning, everybody. Today, we're going to be taking these parts and turning them into this project. So what exactly is this? Well, it's pretty obvious. I've got a couple of chargers up here on the top. This is my all in one solution. For a battery charging solution for me to use at work. I use the Milwaukee M 18 batteries as well as the M12 batteries for. The various tools I have. So the. Standard dual chargers. That do both the 12 volt and the 18. Volt are completely ideal for me. The box itself. Is obviously a milwaukee pack out box. That works. Great with my entire ecosystem because I. Am one of those. Pack out. Nerds. You know, they get a bit of hate for being over popularized, but there's a reason they're popular. They work. Great. So that was the natural choice for the housing for this. And I wanted something. That was easy to take. All my batteries throw into the bottom of this blows it up and take in side on those cold wintery nights.
To make sure the batteries don't die. Prematurely. You could easily fit half a dozen of. The standard 5.0 18 volt batteries and probably a dozen of any 12 volt batteries. That was my. Prototype. So let's build a nice, clean, polished version. This project is very easy. Just about anybody can do it. As far as tools needed. Need a drill, screw. Gun or screwdriver, some. Drill bits and a way to cut some holes in plastic. I used a hole saw and a standard razor knife. You also need. Some way. To cut wood. I used a circular saw, but you could use just about anything. And the parts needed are. Two £10 gas. Kits with. Some standoffs. Three pronged extension. Cable and a dummy plug holder. Oh, yeah. And a piece of wood to actually mount everything to. Now to. Actually get this piece of wood in the top. We have to remove a. Little bit of material. There's these. Little. Standoffs on the lid that are for various different things.
I'm not sure exactly what all. Of these ones are for. We need to remove those. And these little corner. Braces. And I just used a drill bit. And I ran it in reverse to kind of melt it through the material more than anything. So it ran in reverse, popped it. Forward, and it just. Peeled right off. And for those little corner pieces, my razor knife did the trick. It's very easy to cut. A quick measure. Of the lid. And I can easily cut out a piece of wood to fit it into it. The harder part is transcribing these. Holes that we're. Going to use to actually mount this. These utilize quarter 20 bolts that thread. Directly into the plastic, but because of that, they have to be. Extremely. Precise. Follow that up by actually. Drilling quarter inch holes and counter sinking them. And then we can. Start mounting the. Chargers. I laid them out exactly how I wanted to. And you can just. Perfectly fit two of these. Chargers on this lid to have them totally clear everything.
Again, this is a precision moment here. Everything's got to be just so. To make it fit right. A little pre drilled to help keep the wood from peeling up. Handsome, tiny, adorable, mounting screws. And I used these screws to fine tune the tension on the Chargers to. Where gravity alone. Would not make them fall off. And I used my router. To cut. A slot. For the power cable of the top charger to run underneath the bottom charger.
For a nice. Slick look. And some ebony stain to make the. Wood sort of disappear into the lid but still look nice. Like the what it is. All right. So we've got our chargers mounted up on. The top of the box. Now, at this. Point, it technically could be called usable. There's a problem. As soon as you put a little bit of weight, it'll close itself. Now, that. Isn't necessarily the worst thing in the. World. You could take something, you know, you could take something and like prop it up in the. Corner or. Do whatever you like. But we're going to. Be cool in that. We're going to use these gas struts and mount them on the sides. Is this totally necessary? Absolutely not. Am I going to do it anyway? Yes, I am.
All right. So we're going to take these gas struts and we're going to mount them. And you could go a few different ways. You know, you could go a pretty steep angle, something like that. The problem you. Run into is this ends up blocking access. To where. One of the batteries might go. So I'm going to bring it back and mount it like this. Well, then you run into another problem. And you can see that problem exaggerated here. Right here. We're contacting. Before up here. This is anywhere near. It's why it took in 3D, printed these spacers.
They're the same shape as our top bracket there. And now we can mount it wherever along here we'd like. And driver in that. On the bottom. There's a bunch of different. Things you could do, but on these corner pieces you actually have. A. Void right in the bottom there. So if our screws poke through there. It's not going to hurt anything. And that's all I'm going to do. Here we go. So, like I was saying. I just took the. Strut. It's mounted on the top edge and just let it hang here. And I attach that. Just like that. With the one screw. And then to give it a little bit of pretention, I'm actually going to rotate that up and around. And now you can see it's actually a little bit up. From where we need to be. Just like that.
And boom, there we go. This strut is installed. And now we have both struts in and we get the cool auto open. You could technically use this as it is and just take your cords and. Run them to whatever outlet you want. But that's not necessarily a single one step easy process. So I'm going. To add this to a. Three plug, little three foot. Extension cable and. Also. This little guy.
And you'll see what that's for. It's kind of a fancy little extra feature. So the point of doing an extension cord or. Something like this is then I. Only have one thing to plug in. To get every charger in this box running and it's a lot easier and it's. Contained within the box. Makes life a lot simpler, a lot easier. So that divides this box into six relatively equally sized sections. That works out. Pretty well because the standard 5.0 battery such as this fits excellently down in these middle two.

And you can stack these three high in that section four interferes with the Chargers up top. But they don't really fit. So great back here. You can only fit one or two because of the size of the container, which is why I opted to keep our struts all the way back in that very corner. As far as the 12. Volt batteries, those fit in the front, two sections really great where again, these 18 volts don't fit quite as nicely as they do in these middle two.
So that leaves us with these back two, which again, you could. Shove more. 12 volt batteries in. Or we. Could utilize those for some of this cable management, all this extra cable that comes on these. Chargers. That was definitely a much sharper blade, I'm going to say. Now, that's just. Enough to get this started, but not enough to get very far. So like I said, I'm going to take my razor knife and just take this out in the corners. Don't get too crazy with it, though, because this stuff actually cuts incredibly. Easy, especially if you have a nice sharp blade.
Bam. Done just like that. Got it. Just slightly on the square there. Here we go. That's all there is to that. I still might glue it in. Place just because the because the job site. Is a rough place. So now it. Should be able to shove this. In here. And plug it in just like that. Completely enclosed system. Yeah, that will need some glue. All right. Now that we are most of the way done. I've got one last little kind of. Special touch to do. Check that out. That's just the icing on top. Now you really know what's in this box. So I've had a lot of people kind of give me a hard time about this box.
A lot of people have been really excited and. Like, Oh, that's cool concept. But why do you do these certain things about it? For example, the. Struts well, the struts are pretty important. Because without them, as soon as you put a single battery on this, it. Just slams. Itself shut, which is obviously less than ideal. You know, you could probably put some other pack outs right on the top of it to kind of counterbalance it.
But that's just extra steps that you have to worry about. The other main thing. That I get given a hard time about is my gigantic hole in the back for the wire to feed. Through. You can see right here that ends up being not too big of a deal. I've got this grommet piece. I actually got this from work. We have these wire grommet plates that we use to run a big bundle of wire through. You know, when there's like 17 wires, you fit them all. Through this one. Grommet. And incidentally, the hole I drilled in this box happened to be the exact same size of that. So I just stuck one of those in there. If I didn't have that. I was just going. To 3D print or go purchase some other grommet. You can see. It's not really that bad. And the reason I did that is obviously for this giant plug to fit through. Which is where. The other thing people give me a hard time about.
Who wouldn't you just do the mail plug right there and just do an extension cord plugged into it? Well, that's because. Then you have to keep track of. An extension. Cord. And keeping track of. An extension cord is just another piece of the puzzle to lose. And finally, people were telling me, well, why don't you just cut this end. Of this off. And do one of those build a plug things on the end? Well, because. The build a plugs aren't very low profile. The ones I saw, in fact, are all kind of gigantic. The way this is set up right. Now, that. Is basically completely. Flush with the back of this. So you can stack this anywhere. You stack a normal pack out stack and it doesn't interfere at all. So you don't even. Have to think about it. That's the name of the game here. Convenience. Convenient to open. Up. Convenient to plug in and charge it. Convenient to put it back and take it inside. So there's cold winter nights. And that's this project coming to a close.
This particular box. Is actually V two and C here. I've actually built it twice. This one doesn't have the latches on it yet. And I stole my chargers from. It to build this one. So I was able to tidy some things up, like having these holes not perfectly aligned and. Little things like that. The thing is. I don't need two of these. So this one with. A nice 3D printed latch and the stained backplate behind the Chargers here. I'm actually going to be giving this one away. I built this one just for this video, just to show people how it was done, give a nice, cohesive build project video, and I really don't. Need it past that. So if. It's something that you want. All you have to do is. Comment. Down in. The video description below, telling me what you think about the project. And maybe. Some improvements I could make or something you don't like about it. Some sort of. Comment that is productive to the video in the nature of the video as a whole. And I'll filter through those.
Later and add them. To a whole. Pool and. Randomly select one of those commenters to win this box. It will not come with the. Chargers because most. People. Already have a. Whole bunch of these chargers and I. Only have these two. So it won't. Come with those and it won't. Come with the batteries because those are my batteries. What it will come with. Is the extension cord. Inside. The gas struts and the entire mounting system to do everything as it is. So what that. Basically means is as soon as you receive. This, all you have to do is slot on your. Charger, throw. Your batteries in it, and you're good to go. Yeah. Thanks so much for watching. And check out my other videos. I'm going to be doing. Some more pack out stuff here. In the future. It's more labeled. Latches and. Special things like. That, things that are pretty specific to.
My. Life. With the pack out. System and. Just general shop and. Field. Technician type videos coming up here. So if that's something that interests. You, go and subscribe. And I'll get. You then..

