Introduction
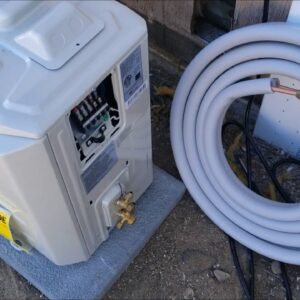
Hello all! In this article, I will be installing and demonstrating how to set up a Sin Ville – Plitt mini-split air-conditioning system. I will go through all the steps of installation, along with showing you the tools and materials needed. I will also give you tips along the way, as well as links to the products used in this installation.
Materials and Tools
This is the list of materials and tools that I used for the installation:
1. Sin Ville – Plitt Mini-split air-conditioning system
2. Copper line set
3. Electrical wires
4. Vacuum pump
5. Vacuum gauges
6. Pad for the outdoor unit
7. Allen key
Note: The links to the products will be provided in the description.
Step 1: Prepare the Area
First, choose the location where you will install the mini-split system. I will be installing the unit with the line set running inside the wall, as it looks more aesthetically pleasing and hidden. To do this, remove the paneling on the wall and cut a hole for the line set to run through.
Next, you will need to place a pad for the outdoor unit to sit on. You can purchase a cheap pad, or if you have a cement pad available, you can use that as well. Ensure that the pad is level before placing the outdoor unit on top of it.
Step 2: Mount the Indoor Unit
Now, it’s time to mount the indoor unit. First, remove the mounting bracket from the back of the unit and place it on the wall. Ensure that the bracket is level and securely screwed into the wall studs. Drill a 3-inch hole through the wall for the line set to run through.
Next, attach the electrical wires to the indoor unit. Be sure to follow the instructions and color codes provided in the manual that comes with your unit.
Finally, mount the indoor unit onto the mounting bracket, making sure it is securely in place.
Step 3: Connect the Line Set and Electrical Wires for the Outdoor Unit
Now for the outdoor unit, you will need to connect the copper line set and electrical wires. Bend the copper line set carefully, as it may kink and restrict the refrigerant flow.
For the electrical wires, ensure that the colors match with both the indoor and outdoor units. Make sure the connections are secure, and consult the schematic diagram provided by the manufacturer.
Note: It is important to follow the manufacturer’s instructions, as there may be differences among various units.
Step 4: Vacuum the Line Set
After securing the connections, you will need to vacuum the line set using a vacuum pump and gauges. This is important to remove any air or moisture from the system, as well as to test for leaks.
First, connect the vacuum pump to the low-pressure side of the system and begin pumping. Watch the gauge and ensure that the pressure drops into a vacuum. Let the vacuum run for 15-20 minutes, then let it sit for an additional 10-15 minutes to ensure there are no leaks.
Step 5: Release the Refrigerant
Now that the vacuum has been completed, it’s time to release the refrigerant into the system. Using an Allen key, open the valves on the outdoor unit to release the refrigerant. Be certain that there are no leaks in the system before completing this step.
With the refrigerant released, you can now remove the vacuum and close the system.
Step 6: Test the Mini-Split System
With everything connected and secured, it’s time to test the mini-split system. Power on the unit and use the remote to control the temperature. Ensure that the indoor unit is cooling properly, and check the outdoor unit to make sure it is operating quietly and efficiently.
Conclusion
The Sin Ville – Plitt mini-split air-conditioning system is a great option for those looking for a cost-effective and efficient cooling solution. By following the steps outlined in this article, you can successfully install and operate this system in your home.
Make sure to always follow the manufacturer’s instructions and consult a professional if you are unsure about any aspect of the installation process.
If you have any questions or need assistance, feel free to leave a comment below and I will do my best to help!

